Posts tagged ‘apple 10.5 tutorials’
Apple iTunes Tutorial
 For users who prefer to learn Apple Leopard 10.5 visually we have a range of video tutorials, this method of training greatly enhances learning and allows beginners to master Apple Leopard 10.5 at their own pace.
View the Apple Leopard 10.5 Tutorial Videos
Beginners iTunes Tutorial
Getting More Out of iTunes
iTunes is a powerful application for managing your audio and video files, and Apple wants you to know it. They’ve made it the heart of all media playback on the Mac, and as long as you’re using an iPod and you buy songs only from the iTunes Music Store, you really shouldn’t have problems.
But if you’re like the rest of us, and you have a bunch of random music files you’ve collected over the years, or if you use a non-Apple MP3 player, or if you just feel like iTunes gets in your way as much as it helps you, this is the tutorial for you.
Part I: Reclaim Control of Your Files
Changing the Default Application
When OS X sees an MP3 file on your computer, it assumes you want iTunes to open it by default. In many scenarios, it’s not a bad choice. iTunes’ specialty is handling large amounts of properly labeled music files and making them easy to find and play. But there are many cases in which iTunes is overkill. If you’ve downloaded a small song clip, a recording of a speech, or any number of audio files that wouldn’t fit in your media library, you need an intermediate solution.
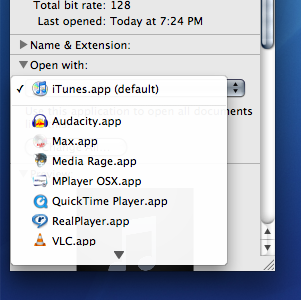
Whether you’d rather use Quicktime or the freeware VLC Media Player (which has the advantage of supporting nearly all audio and video formats), you can change the default application for opening a file by right-clicking (or Ctrl+clicking) and selecting Get Info. Near the bottom of the menu that appears, the “Open with” section allows you to pick the program of your choice from a drop-down list. Click the “Change All” button to make your choice the default application for all MP3 files.

Now you can quickly play downloaded audio files without launching iTunes and having them automatically added to your library. Best of all, you can still import them if you want to by dragging the files over the iTunes icon in the dock or into an open iTunes window.
Adjusting iTunes Import Settings
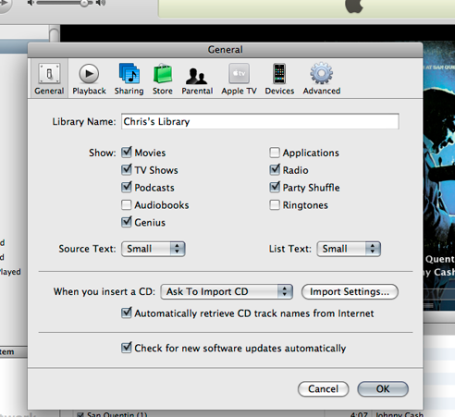
There are a few features you can change within iTunes to maximize compatibility with other computers and non-iPod portable players. The first thing you’ll want to change is the CD Import settings. Open the iTunes dropdown from the menu bar and select Preferences. In the General tab of the Preferences menu, click the button for Import Settings.

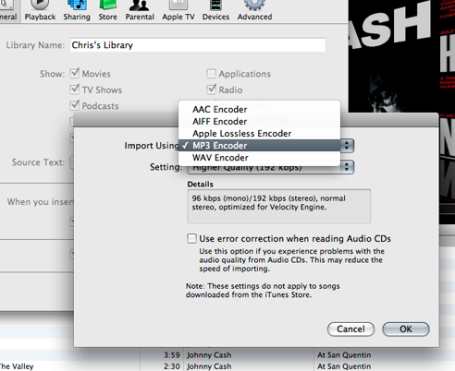
These are the default settings for ripping an audio CD into your iTunes library. Apple, naturally, wants you to rip your songs into their proprietary AAC format. It offers a good file size for its quality, but it ultimately limits your playback options to Apple solutions. Click the dropdown menu for “Import Using” and select MP3 Encoder to rip your songs in the most flexible format. Choosing Higher Quality (192 kbps) from the Setting dropdown offers a good compromise between file size and sound quality.

You should make these two easy adjustments to any new iTunes installation. Apple has made the default settings what they are for business reasons, not functionality. But now you know the first step for put iTunes in its place, handling your permanent music collection and not taking control of every little audio file on your computer.
In the next tutorial, you will learn how to optimize hidden settings and features.
Mac 10.5 Leopard Tutorials – Right Click Mouse
 For users who prefer to learn Apple Leopard 10.5 visually we have a range of video tutorials, this method of training greatly enhances learning and allows beginners to master Apple Leopard 10.5 at their own pace.
View the Apple Leopard 10.5 Tutorial Videos
How to Enable Right Click on a Apple Leopard 10.5
Enable Your Apple Two-Button Mouse in OS X 10.5
Every mouse that Apple currently ships has two buttons. They just act like they don’t want you to know about it.
Since first introducing the mouse to home computer users with the original Macintosh in 1984, Apple has had a strong attachment to the one-button mouse, even as many PC manufacturers switched to a two-button design in the years to follow. Apple defenders claimed that the one-button design was originally chosen because of its ease of use and aesthetic simplicity, and, while that may have been true at one point, the argument is now moot.
In 2005, Apple released the Mighty Mouse, a smooth white optical mouse that resembled its one-piece predecessors but had an additional hidden trigger for a right-click underneath the plastic shell. It was the company’s way of giving in to people wanting a real right-click while sticking to their original one-button look. It’s now the standard mouse for all new Mac desktops, coming in both a wired and wireless version.

The problem is that the right button is disabled by default. To fix this oversight and get the most out of your Mighty Mouse, we need to open the System Preferences menu, located in your Applications folder or the Apple menu in the taskbar at the top left corner of your screen.

Once in System Preferences, go to Keyboard & Mouse settings.

From here, you have many options to customize the way your buttons and scrolling work, but to enable right-clicking, simply click on the dropdown menu marked for the right button and change the setting from “Primary Button” to “Secondary Button” and leave everything else as it is.

If you want to pretend that you still have only one button (or if you’re a Mac user stuck with a one-button mouse), you can still hold down the Ctrl key while performing a normal click, and it will register as a right-click.